The lake house in Ellington CT was the first chance I was able to see the methods for using SIPS (Structural insulated panels) as an enclosure system for a timber frame. A crew came in from Panel Pro in New Hampshire and hung most of the panels, which were pre-cut at their shop, with a lull and four guys. Before they did a wall section, we hung the drywall on the outside of the frame. This was amazingly fast; afterwards we could go back from the inside and screw it off easily and cut out the openings.
Friday, December 12, 2008
Finishing touch
Tuesday, November 25, 2008
Cold Lake frame
This past weekend we put up the frame we have been cutting for the last couple of weeks; a small 2 bedroom house on Crystal Lake- or as Bobby likes to call it 'Ice Station Zero'. The wind off the lake made the site prep week a little chilly but it is a really nice spot- we even saw a bald eagle pair (adult and juvenile) fishing in the lake one day. The raising went really well despite the low temps and there was a great crowd of about 50 that had the whole structure up in about 6 hours!
Here is the site the week before raising with 3 bents assembled and waiting.
The coolest feature of the house for me was the timber framed dormer (designed and executed by Brendan) that involved a bunch of compound angles even thought the roof was a 12/12 pitch.
Here is the top of the bent 2 post that will catch a connecting girt, a valley beam, a common rafter, and the dormer gable rafters.
Thursday, September 25, 2008
Ivy League Frame
The site had a brick pizza oven that ended up under the pavilion.
Bringing the heavy-ass (some were ~650 lbs. each) top and bottom chords to the site:
The pavilion looking up from the gardens-
Cedar trellis joined to rafter pairs and splined into upper chords:

Looking out from under the central truss:
A very cool juncture in my opinion, the center of the structure where the summer beams meet the middle truss: Another highlight I thought, was the group of angles meeting at each post, the steep angles of the truss bracing and the outer struts next to the normal braces running to the plate:
Monday, August 11, 2008
Barnraisin!
Its been forever since I updated this particular blog- but now that we have moved someplace we will stay for a while, I will try to be a little better at keeping things current, though I'm not sure if I will ever find the time to go back and post about everything that happened last summer while I was at Heartwood. On to the present!
I've been working with a small company called the Barnraisers over the last few weeks. I joined them a little more than halfway through cutting the joints for a four stall, 28'x36' horse barn in East Haddam. Yesterday was raising day and there were probably a good fifty or sixty folks that showed up to help, including the four apprentices from this year's Heartwood class.
The video above shows the last of the four bents being raised into place. Its amazing how easily even a small group of people can lift such a massive (in this case, we calculated each bent to be about a ton) amount of weight when the load is distributed.
The other amazing thing about this group is how flawlessly the joinery goes together on raising day. Brendan (the foreman and owner of the company) is the most precise, yet easy-going guy I have ever met. We take great care while all the material is on the ground in the yard- to layout perfectly, triple check everything and then get super fussy about the exactitude of actually cutting the joints. With the exception of circular saws for some rough cuts, everything is cut by hand with chisel and mallet, hand cranked boring machine, or an adze. I have learned a ton in the last three weeks, mostly thanks to Brendan, Bobby, and Splint's generosity in sharing what they know about every aspect of timberframing. It all comes together on raising day; the crowd was amazed that this whole complicated structure went up and even had a roof on in about 9 hours.
This is Brendan's 'shop', its the cleared space in his yard where there will eventually be a big barn and workshop; for now its a flat space to lay out timbers.

A pile of braces with a boring machine on top; this is what we drill out mortises with, its amazingly fast and effective- and very quiet with no sawdust!

The first bent put together and laid out on the ground beforehand- every piece of the barn was organized and laid out around the site in the exact order and orientation in which it would end up in the building.

The second bent raised and connected on the sides by girts and in the middle with dovetailed joists.

Scarf joint in the plate, the longest stick in the barn.

Dovetailed joist ends.

Brendan and Splint installing the hay hook-

I've been working with a small company called the Barnraisers over the last few weeks. I joined them a little more than halfway through cutting the joints for a four stall, 28'x36' horse barn in East Haddam. Yesterday was raising day and there were probably a good fifty or sixty folks that showed up to help, including the four apprentices from this year's Heartwood class.
The video above shows the last of the four bents being raised into place. Its amazing how easily even a small group of people can lift such a massive (in this case, we calculated each bent to be about a ton) amount of weight when the load is distributed.
The other amazing thing about this group is how flawlessly the joinery goes together on raising day. Brendan (the foreman and owner of the company) is the most precise, yet easy-going guy I have ever met. We take great care while all the material is on the ground in the yard- to layout perfectly, triple check everything and then get super fussy about the exactitude of actually cutting the joints. With the exception of circular saws for some rough cuts, everything is cut by hand with chisel and mallet, hand cranked boring machine, or an adze. I have learned a ton in the last three weeks, mostly thanks to Brendan, Bobby, and Splint's generosity in sharing what they know about every aspect of timberframing. It all comes together on raising day; the crowd was amazed that this whole complicated structure went up and even had a roof on in about 9 hours.
This is Brendan's 'shop', its the cleared space in his yard where there will eventually be a big barn and workshop; for now its a flat space to lay out timbers.
A pile of braces with a boring machine on top; this is what we drill out mortises with, its amazingly fast and effective- and very quiet with no sawdust!
The first bent put together and laid out on the ground beforehand- every piece of the barn was organized and laid out around the site in the exact order and orientation in which it would end up in the building.
The second bent raised and connected on the sides by girts and in the middle with dovetailed joists.
Scarf joint in the plate, the longest stick in the barn.
Dovetailed joist ends.
Brendan and Splint installing the hay hook-
Saturday, September 29, 2007
Natural Building: Enclosures
What I thought was really interesting and rewarding about the natural building week was the chance to listen to Micah talk about 'natural' enclosures for timber frame structures. Straw bales are of course an option and have their own issues. There is also the Structural Insulated Panel option, or some combination of conventionally framed walls (though that may seem a bit redundant). What Micah proposed was a light framework stuffed with a compacted straw clay mixture. You mix the straw (we did it with a pitchfork on a big table but you could set up a rotating drum mixer) with clay slip-a watery clay mix, and then pack the stuff down into formwork built between the timberframe structure. Once the straw sets (quite quickly) you remove the plywood forms and work your way up the wall; this is nice because you can repeatedly re-use a single set of forms. In this example structure, he also showed how you could make the walls with lathe to later accept natural clay plaster.


Corner detail with minimal thermal bridging.
Mixing the straw and clay slip.
Tamping down the corners.

It was amazing how quickly the wall setup, and even more so how solid it was after only a few hours. Breaking it down the next day was like busting up concrete.
Corner detail with minimal thermal bridging.
Wednesday, September 26, 2007
Heartwood week 2: Natural Building
Week two at Heartwood began by meeting our two young instructors for the following week's class on Sunday; Jonah and Micah (a former Heartwood apprentice himself) both pulled into the yard in bio-fuel-powered diesel 4x4s and it looked like the week was off to an interesting start.
To be brutally honest, when I had signed up for classes this summer, I actually had thought of skipping this week. The class was supposed to be about building an 'earthen oven' which I really didn't know anything about and I was really trying to concentrate on timberframing skills- not to mention I was attempting to keep a tight grasp on an already loosening budget. With Will's encouragement though, I agreed to sign up anyway and man am I glad I did. Every week this summer had something unique going for it; every week yielded unexpected enlightenment and knowledge- but this week of natural building class opened my eyes to a new perspective about something I had thought myself pretty up to date on.
By that I mean I had been reading a lot about green building and sustainable development (two terms that are certainly still being defined, especially in the field of construction) over the last couple of years. What I wasn't familiar with was the approach towards building that Jonah and Micah explained as Natural Building. This wiki gives a pretty good overview actually.
My take on this is that wherever possible you should try to use building materials that are locally available, renewable, and pose no harm if they eventually re-enter the ecosystem.
As Jonah explained it, natural building is something altogether different than what many people term 'green building'. From what I learned over the week, this difference lies not just in the approach, but in the attitude and the reasons why one chooses to build in the first place. Jonah stated that natural building is a movement of people- that is local and grassroots. One tenet is to keep in mind what sort of building is appropriate for the locale- this will help determine your materials. Natural building is based on relationships with your local environment and neighbors- social and cultural relationships are a priority. Natural building looks to be spiritually enriching and its proponents attempt to be inclusive of all ages and skills. Natural building takes a holistic approach versus Green building's commodity based focus on efficiency.
Okay, so those are my notes from some of our discussions and lectures. I am still on the fence about some of these ideas- but I love the discussion. My attraction to building is the satisfaction at being creative with objects and spaces that are practical, used in, and lived. I love the idea of building as an exercise, of architecture as a sculptural project- but I wonder about natural building's application with more standard spaces.
All philosophical mumbo jumbo aside- we had a great time with Micah and Jonah learning about new techniques and discussing how to be a little more conscious of where your materials come from. Everything for this project was certainly from a 100 mile radius- and none of it will harm anyone or thing if the oven gets knocked over or is worn away by time.
Making cob is pretty cool. There are ways to mechanize the process, but mixing small batches by hand (foot actually) fit the scale and tone of this project much better. It brought home the point that this sort of building is labor intensive in a a way that you have to embrace to really get anything worthwhile from the experience. In this sense this sort of small natural building project lends itself nicely to small groups or communities, schoolchildren, or just neighbours.
I realise as I write this (and this is the point of this blogging/writing thing) that I have too much to say, to think about, with all these ideas for this one simple post so I will try to get on with just describing our project.
Before any of the other eight students showed up, the four apprentices and our to instructors surveyed the site and discussed what exactly we would make and where it would go. As the site was on the side of a hill and the oven would need access from the kitchen, there were alot of considerations. This was the beginning of our orientation with what the guys meant about natural building decision making and I was pleasantly surprised. They really took into account your opinions about matters; while forming an opinion showed us that 1) our input was actually likely to count and 2) this was not going to be just following orders kind of learning- your input meant your investment. It is certainly not every forum or building project that can offer this, but it felt right for the project.
The goal (did you think I would ever get there?) was to build an outdoor cob pizza oven with an integrated bench. For 20 years worth of summer Thursdays, Will and Michelle have been putting on great hamburger barbecues but they were ready for a little variety.
We would make the structure from field stone, sand, clay, water, straw, some firebrick, a couple pieces of cherry cut from a tree on the site, planer shavings, and beer bottles (brewed and bottled in VT- thats a refund we gave up!).
Our materials for the cob: straw, clay, and sand.

Cob is a simple, resilient, strong, and flexible building material. A good bit of sand is dumped on a tarp and some clay is added- that is mixed together for a while until consistent and then straw is added as a binder (think of the fibers in fiberglass). This malleable mixture can be used for a vast range of applications.
Dave shows off the classic cob dance:

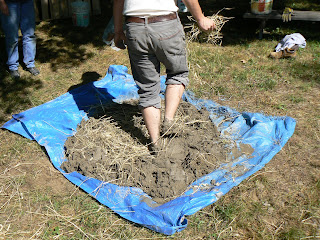
Rolling the tarp up to help in mixing- it reminded me of kneading a huge batch of bread dough...
The base of field stone has been painstakingly placed in a surprisingly strong interlocking pattern, the cob pillar and back for the bench are in place and developing, and the base of the oven is being formed to create an insulated platform- a batch of cob lies ready for business.
There was a lot of steps between this stage and the previous photos- I think I was too busy dancing on the cob to pick up my camera much (and was probably trying to keep it clear of the clay and sand...)

Lois, of the ever wonderful and intrepid Lois and Louis, getting down and dirty with the bench seat-

This insulative layer was made of clay slip (planer shavings and wet clay) and some donated beer bottles laid flat to create air spaces.


A flat and level layer of normal firebrick creates the floor of the oven, laid dry into sand that covered the insulating layer of beer bottles...
One of the astounding parts of building this deceptively simple oven was the dome of sand we used to form the oven cavity itself. Wet sand was formed to a certain dimension (agreed upon by oven builders as the ideal shape and size for a flueless-firing and maximum heat retention) and then we built another layer of insulation and cob over it, eventually removing the sand when everything had pretty much set.
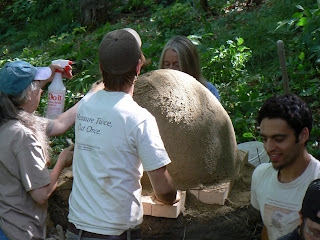
The furry dome of insulation with a field stone lintel set up to delineate the doorway; one more layer of cob and we will be getting closer to pizzas- depending on the weather- note the tent over the site...

Fired up! In an attempt to speed things up and combat the very damp weather, we have removed the sand and lit a fire in the dome to try and harden the cob layers.

We've added the final coat of clay plaster and natural paint tinted with iron oxide-
The wet weather and hasty schedule result in a slump in the back of the oven- highlighting the advantages of the material; some students more familiar with braiding hair use straw to shore up the spot and we plaster over it...

Carved and scribed door and handle; the apprentices were respectively psyched to do something with wood again finally...

The final product getting warmed up for its first batch of pizzas-
Each student made a 'peel', what for you slide the pizzas in and out with- an great time and delicious dinner was had by all- the first dozen pizzas cooked quickly about 2-3 minutes each at approximately 575-625 F.

To be brutally honest, when I had signed up for classes this summer, I actually had thought of skipping this week. The class was supposed to be about building an 'earthen oven' which I really didn't know anything about and I was really trying to concentrate on timberframing skills- not to mention I was attempting to keep a tight grasp on an already loosening budget. With Will's encouragement though, I agreed to sign up anyway and man am I glad I did. Every week this summer had something unique going for it; every week yielded unexpected enlightenment and knowledge- but this week of natural building class opened my eyes to a new perspective about something I had thought myself pretty up to date on.
By that I mean I had been reading a lot about green building and sustainable development (two terms that are certainly still being defined, especially in the field of construction) over the last couple of years. What I wasn't familiar with was the approach towards building that Jonah and Micah explained as Natural Building. This wiki gives a pretty good overview actually.
My take on this is that wherever possible you should try to use building materials that are locally available, renewable, and pose no harm if they eventually re-enter the ecosystem.
As Jonah explained it, natural building is something altogether different than what many people term 'green building'. From what I learned over the week, this difference lies not just in the approach, but in the attitude and the reasons why one chooses to build in the first place. Jonah stated that natural building is a movement of people- that is local and grassroots. One tenet is to keep in mind what sort of building is appropriate for the locale- this will help determine your materials. Natural building is based on relationships with your local environment and neighbors- social and cultural relationships are a priority. Natural building looks to be spiritually enriching and its proponents attempt to be inclusive of all ages and skills. Natural building takes a holistic approach versus Green building's commodity based focus on efficiency.
Okay, so those are my notes from some of our discussions and lectures. I am still on the fence about some of these ideas- but I love the discussion. My attraction to building is the satisfaction at being creative with objects and spaces that are practical, used in, and lived. I love the idea of building as an exercise, of architecture as a sculptural project- but I wonder about natural building's application with more standard spaces.
All philosophical mumbo jumbo aside- we had a great time with Micah and Jonah learning about new techniques and discussing how to be a little more conscious of where your materials come from. Everything for this project was certainly from a 100 mile radius- and none of it will harm anyone or thing if the oven gets knocked over or is worn away by time.
Making cob is pretty cool. There are ways to mechanize the process, but mixing small batches by hand (foot actually) fit the scale and tone of this project much better. It brought home the point that this sort of building is labor intensive in a a way that you have to embrace to really get anything worthwhile from the experience. In this sense this sort of small natural building project lends itself nicely to small groups or communities, schoolchildren, or just neighbours.
I realise as I write this (and this is the point of this blogging/writing thing) that I have too much to say, to think about, with all these ideas for this one simple post so I will try to get on with just describing our project.
Before any of the other eight students showed up, the four apprentices and our to instructors surveyed the site and discussed what exactly we would make and where it would go. As the site was on the side of a hill and the oven would need access from the kitchen, there were alot of considerations. This was the beginning of our orientation with what the guys meant about natural building decision making and I was pleasantly surprised. They really took into account your opinions about matters; while forming an opinion showed us that 1) our input was actually likely to count and 2) this was not going to be just following orders kind of learning- your input meant your investment. It is certainly not every forum or building project that can offer this, but it felt right for the project.
The goal (did you think I would ever get there?) was to build an outdoor cob pizza oven with an integrated bench. For 20 years worth of summer Thursdays, Will and Michelle have been putting on great hamburger barbecues but they were ready for a little variety.
We would make the structure from field stone, sand, clay, water, straw, some firebrick, a couple pieces of cherry cut from a tree on the site, planer shavings, and beer bottles (brewed and bottled in VT- thats a refund we gave up!).
Our materials for the cob: straw, clay, and sand.
Cob is a simple, resilient, strong, and flexible building material. A good bit of sand is dumped on a tarp and some clay is added- that is mixed together for a while until consistent and then straw is added as a binder (think of the fibers in fiberglass). This malleable mixture can be used for a vast range of applications.
Dave shows off the classic cob dance:
There was a lot of steps between this stage and the previous photos- I think I was too busy dancing on the cob to pick up my camera much (and was probably trying to keep it clear of the clay and sand...)
Lois, of the ever wonderful and intrepid Lois and Louis, getting down and dirty with the bench seat-
This insulative layer was made of clay slip (planer shavings and wet clay) and some donated beer bottles laid flat to create air spaces.
A flat and level layer of normal firebrick creates the floor of the oven, laid dry into sand that covered the insulating layer of beer bottles...
Fired up! In an attempt to speed things up and combat the very damp weather, we have removed the sand and lit a fire in the dome to try and harden the cob layers.
We've added the final coat of clay plaster and natural paint tinted with iron oxide-
Carved and scribed door and handle; the apprentices were respectively psyched to do something with wood again finally...
Subscribe to:
Posts (Atom)