Sunday, June 21, 2009

Outpost

This spring I was able to find a couple small projects for folks in the neighborhood, that I was able to use to fill the gaps between Barnraiser projects and while we are getting ready to move to our new house in Middletown. The first was a nearly 100% recycled/repurposed little garden building that the owners call the 'Outpost'. They have an amazing acre of garden and they were looking for a small timberframe that blended in to the landscape, allowed them to see the garden from the bottom of the property and would serve as a screened in space to watch birds and generally hang out. The timber came from a local house circa 1730 or so that had been dismantled years ago with the hopes that it could be sold off- it was a timberframed farm house called the A.C. Peterson house. Unfortunately they had never found a buyer and a lot of the frame had been pieced out, burned for heat, or sadly left outside to rot. My clients ended up with some long (24') plates, lots of 4' braces, a load of smaller (4"x4") connectors, and a few random posts. It was mostly red oak, with a few sticks that I am pretty sure were ash (but perhaps some chestnut as well). The sheathing had been horizontally run 1" thick, wide (17-20"), pine boards. Most of the original frame had been hand hewn, and there were a lot of the original marriage marks made with a race knife.

The garden at Chip and Catherine's is a beautiful place to work, and I was thrilled to have people who actually wanted me to go through their barn full of old timbers and come up with a design for a little building. It was a challenge working with the hewn timbers for layout-- I don't have much expereince with scribe work on that scale-- but it was really fun- and inspiring to see how the hewer had been able to make these relatively square timbers from trees of varying sizes.


A lot of time was spent organizing what was left of the old house, figuring out where it could be used in the design, cleaning and pulling nails, cutting out rot, and redesigning after I found something else that was cool.


We originally thought we would put a living roof on the building, thus the flat and relatively low pitched rafters. Since the two main advantages of a green roof like that would be dealing with water runoff and insulating the space beneath it (neither of which were issues here) we decided to forestall that experimental idea. Also, once they saw the view from up there, they wanted access to put some chairs!


Dealing with the out of square posts--

I'd like to know more about this technique; it looks like they used a form of square rule (everything was 1.5 or 2" off a reference w/ 1.5 or 2" mortises and tenons) but it looks like they used a 45 degree angle to make cross hatches at the ends of the mortise layout. I'm sure the joinery shrunk and moved a bit over time, but it was interesting to see that there was some slop, a few fixed mistakes, and some out of square-ness that was in the original frame. It stood that way for almost 300 years so I guess that says something about being overly picky.


I didn't originally intend the lap joints for the rafters to run so deep (they have released some tension in already heavily crowned plates) but I had to work off a straight line for my reference and didn't think about how much they would spring. These were 4x6 solid oak though and they never felt weakened; when I put them up on the posts the settled right back down with the weight of the rafters on them--


View from on high--

Since there had been a lot of joinery previously cut into the timbers I had for posts, I opted to set the bracing in, rather than mortise and tenon the whole joint for the down braces. The two braces that run up to a rafter in the back of the building are fully mortised.
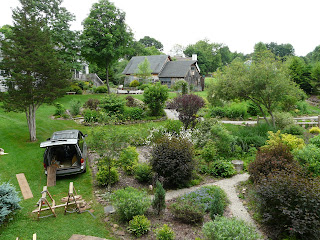


The garden is awesome for bird watching--
Barn swallow babies getting irate with hunger:


Mock. Yeah. -ing. yeah.

When I get back on site I will get some more pictures of the siding and the (nearly) finished outpost.


Saturday, May 02, 2009

Cedar Pergola

Here is a small project that I designed and cut on my own and raised with the help of my friend Splint. Its a 5'x9' Western Red Cedar pergola that was designed to go over a pathway and have two benches fit into the shorter sides.


Monday, March 23, 2009

Back in business

We had some time off around the holidays (when I built the garden shed for my brother) but we got back on it- weather permitting- in January. Our next project was a 36'x36' barn/workshop/garage in Middlefield that includes two sheds off the main footprint.
I almost called this post 'Raising Hell' considering how beat up I felt after this week- but I don't want to sound negative. It was a busy week- the Barnraisers had a big raising on Saturday (the 36'x36' barn/garage/workshop) and the week before any raising is busy moving beams and getting the site prepped; but we were especially busy because we had spent our spare time the week before cutting a massive oak and hickory first floor frame for Brendan's own barn which we raised on Wednesday with just the four of us. That barn will allow us some shelter to work under during the heat and cold which will be great but damn were those some heavy beams! 
One of the coolest elements in the big barn/workshop was how Brendan cut the timberframe cupola- its basically like building a small complete building that sits on top of the barn- with some pretty neat compound joinery. Here it is organised at the site in a little pile all its own: 


Cupola elements-


Here we have bents 1, 4, and 5 built and pegged and ready to raise. Bents 2 and 3 will be built during the raising- -


Building bents and getting everything into the right level and square position--


In the cutting yard and when we transport everything to the site, we always stack all elements of the building carefully and in the order they will be raised and in the orientation they relate to each other in the plan. This is another way to insure that all dimensions and proprtions are quadruple checked; a misscut or incorrect layout is more likely to be noticed when everything is lined up and stacked together in order--


Attaching the 4"x10" oak sills to the foundation walls--


This frame was 4 trailer loads of beams- it took us a week to lay down the sills, organize the site for raising and build the first couple of bents--


Lots of piles--


Raising day was a big success- lots of enthusiastic folks helped us get everything up and the roofing up to the cupola level on by 5pm--
We were lucky to have a good photographer share some shots during the raising so I actually have some photos from that this time.

Raising bent 2--


Temporarily bracing connectors before we raise bent 3-
Why do the two guys on the scaffold have hardhats and no one on the ground?


Bents 1-4 are raised and we are handing up flooring to make a platform in the loft to build off of--


Raising the purlin plates--


Handing up the plate with plenty of folks--


The purlin plate is scarfed together; this is the biggest, heaviest stick that has to go up the highest. Its actually a bit safer than it looks; it goes up a little at a time and then drops right into place. This is the moment when having your joinery spot on is so very critical- you do not want to try to maneuver this piece around to adjust it once it is up in the air--


Persuading the purlins onto the queen post tenons--


Handing up the rafters--


Maintaining the plumber butt in spite of a belt AND suspenders--


Getting the roof boards on--


The end of raising day--


All in a day's work--


A few days before all this we spent cutting and raising the first floor of Brendan's barn in his yard. A lot of the timbers had come off his property- hickory, oak, and maple.
It was exciting to see a building take shape over our cutting yard- where we are used to working out in the open--

Half the scarf joinery at the end of the 9"x14" oak beam that spans the 20' bay--


Using my fat ass for leverage; its important!


Getting there--


Safer than it looks, I swear--


Handing up the smaller of the oak beams--


Splint and Bobby straddle the clear span--


The two big spans raised into place by lunchtime--


The 2nd floor joists in place; notice the steep hill you have to climb to bring each joist up into position!