So this was a while ago, I want to say last Fall- yes because the clients were trying to get in the house be Thanksgiving (which never happened). They could have moved into the barn we raised- it was done in a couple of months!
This was a cool frame- designed as a workshop and storage for sailboats, wide clearance in the main bays and a long saltbox on the North side. A great example of metal roofing- cut to fit exactly in the factory- so no waste on the site. Powder coated and very strong- I think the guarantee is for 30 years but that is just because the product in this form hasn't been around very long. A nice no worry roof that installs quickly (we did this in a day and half- paper, strapped and metal screwed down by 3 guys) and is very durable.
Aside from the wood scrap (a lot of which we brought home to be repurposed) this was the 'dumpster' from the job site. Everything else was recycled or put aside to be burned in the yard for the winter job coming up.
Friday, November 13, 2009
Tuesday, November 03, 2009
Extracurricular activities
Between timber framing jobs, I've been taking on some interesting side projects. Here is a bed frame that I made from old cedar fence posts; the clients were into rowing and had a cool old oar that we incorporated into the footboard.
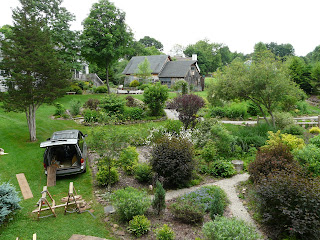
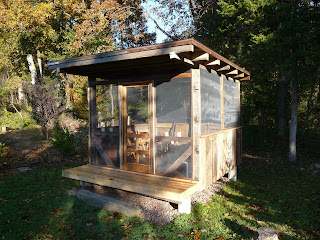
I put the last touches on the Outpost at Chip and Catherines' house- a cedar deck and the last of the screening--
Chip also had an idea for firewood storage on the side of the barn; we built a shed roof supported with simple brackets and used some locally harvested cedar to make the ends--
I put the last touches on the Outpost at Chip and Catherines' house- a cedar deck and the last of the screening--
Chip also had an idea for firewood storage on the side of the barn; we built a shed roof supported with simple brackets and used some locally harvested cedar to make the ends--
Saturday, August 01, 2009
New Additions
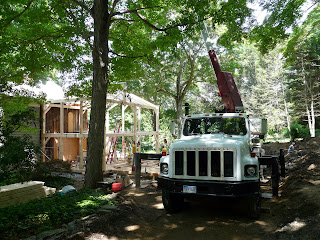
Been quite busy this summer- we bought a house in Middletown CT and moved in July (its a 1910 colonial) and between that and a bunch of projects I've been pretty slack about updating the 'ol blog. We were lucky that the main summer project was on a nicely wooded lot that provided nice cool shade (on the few days it wasn't raining!). This frame is an addition onto an early 1800s home in Hadlyme that made a new master suite and kitchen. It was the first frame I
have taken part in that was put up with a crane, which definitely had its advantages- we had the whole thing up and pegged by mid afternoon!
All the bents prepped and ready on the deck--
White oak sills with dovetail mortise for summer beam and square mortise for post- note beveled dado for straps that will be nailed off to post and go behind SIP.
The house after demo and before the frame is raised--
Inside the kitchen space-
Panels on- what an amazing thing; just having plastic over the window and door openings, the difference in temp was 15 degrees between the inside and outside! Those things really work.
The panels came the same day we were crane raising unfortunately; we just worked around them--
After, view from street--
Kitchen on left, below right is dining, entrance and 1/2 bath, upstairs right is master BR, bath, and huge closets.
Custom milled trim to match old home--
Wednesday, July 29, 2009
Pizza Hut
The other spring project I had this year was also in Bloomfield. The frame I had put out in the front yard was the best advertisement I could have done- both of the the small projects I had this spring came from that frame. Another neighbor came by and wanted to design a timberframe to go over an outdoor pizza oven. We came up with this- and eventually we will roof it with cedar shake and build a cob oven underneath it.
White oak posts and a 6 pitch roof to fit under the overhanging hemlocks near the driveway.
This joint on the end rafters was a little puzzling but actually pretty straightforward to cut--
A family raising--
Most of the work was done in June- 26 of 30 days were raining and there were a lot of tarps involved--
Sunday, June 21, 2009
Outpost
This spring I was able to find a couple small projects for folks in the neighborhood, that I was able to use to fill the gaps between Barnraiser projects and while we are getting ready to move to our new house in Middletown. The first was a nearly 100% recycled/repurposed little garden building that the owners call the 'Outpost'. They have an amazing acre of garden and they were looking for a small timberframe that blended in to the landscape, allowed them to see the garden from the bottom of the property and would serve as a screened in space to watch birds and generally hang out. The timber came from a local house circa 1730 or so that had been dismantled years ago with the hopes that it could be sold off- it was a timberframed farm house called the A.C. Peterson house. Unfortunately they had never found a buyer and a lot of the frame had been pieced out, burned for heat, or sadly left outside to rot. My clients ended up with some long (24') plates, lots of 4' braces, a load of smaller (4"x4") connectors, and a few random posts. It was mostly red oak, with a few sticks that I am pretty sure were ash (but perhaps some chestnut as well). The sheathing had been horizontally run 1" thick, wide (17-20"), pine boards. Most of the original frame had been hand hewn, and there were a lot of the original marriage marks made with a race knife.
The garden at Chip and Catherine's is a beautiful place to work, and I was thrilled to have people who actually wanted me to go through their barn full of old timbers and come up with a design for a little building. It was a challenge working with the hewn timbers for layout-- I don't have much expereince with scribe work on that scale-- but it was really fun- and inspiring to see how the hewer had been able to make these relatively square timbers from trees of varying sizes.
A lot of time was spent organizing what was left of the old house, figuring out where it could be used in the design, cleaning and pulling nails, cutting out rot, and redesigning after I found something else that was cool.
We originally thought we would put a living roof on the building, thus the flat and relatively low pitched rafters. Since the two main advantages of a green roof like that would be dealing with water runoff and insulating the space beneath it (neither of which were issues here) we decided to forestall that experimental idea. Also, once they saw the view from up there, they wanted access to put some chairs!
Dealing with the out of square posts--
I'd like to know more about this technique; it looks like they used a form of square rule (everything was 1.5 or 2" off a reference w/ 1.5 or 2" mortises and tenons) but it looks like they used a 45 degree angle to make cross hatches at the ends of the mortise layout. I'm sure the joinery shrunk and moved a bit over time, but it was interesting to see that there was some slop, a few fixed mistakes, and some out of square-ness that was in the original frame. It stood that way for almost 300 years so I guess that says something about being overly picky.
I didn't originally intend the lap joints for the rafters to run so deep (they have released some tension in already heavily crowned plates) but I had to work off a straight line for my reference and didn't think about how much they would spring. These were 4x6 solid oak though and they never felt weakened; when I put them up on the posts the settled right back down with the weight of the rafters on them--
View from on high--
Since there had been a lot of joinery previously cut into the timbers I had for posts, I opted to set the bracing in, rather than mortise and tenon the whole joint for the down braces. The two braces that run up to a rafter in the back of the building are fully mortised.
The garden is awesome for bird watching--
Barn swallow babies getting irate with hunger:
Mock. Yeah. -ing. yeah.
When I get back on site I will get some more pictures of the siding and the (nearly) finished outpost.
The garden at Chip and Catherine's is a beautiful place to work, and I was thrilled to have people who actually wanted me to go through their barn full of old timbers and come up with a design for a little building. It was a challenge working with the hewn timbers for layout-- I don't have much expereince with scribe work on that scale-- but it was really fun- and inspiring to see how the hewer had been able to make these relatively square timbers from trees of varying sizes.
A lot of time was spent organizing what was left of the old house, figuring out where it could be used in the design, cleaning and pulling nails, cutting out rot, and redesigning after I found something else that was cool.
We originally thought we would put a living roof on the building, thus the flat and relatively low pitched rafters. Since the two main advantages of a green roof like that would be dealing with water runoff and insulating the space beneath it (neither of which were issues here) we decided to forestall that experimental idea. Also, once they saw the view from up there, they wanted access to put some chairs!
Dealing with the out of square posts--
I'd like to know more about this technique; it looks like they used a form of square rule (everything was 1.5 or 2" off a reference w/ 1.5 or 2" mortises and tenons) but it looks like they used a 45 degree angle to make cross hatches at the ends of the mortise layout. I'm sure the joinery shrunk and moved a bit over time, but it was interesting to see that there was some slop, a few fixed mistakes, and some out of square-ness that was in the original frame. It stood that way for almost 300 years so I guess that says something about being overly picky.
I didn't originally intend the lap joints for the rafters to run so deep (they have released some tension in already heavily crowned plates) but I had to work off a straight line for my reference and didn't think about how much they would spring. These were 4x6 solid oak though and they never felt weakened; when I put them up on the posts the settled right back down with the weight of the rafters on them--
View from on high--
Since there had been a lot of joinery previously cut into the timbers I had for posts, I opted to set the bracing in, rather than mortise and tenon the whole joint for the down braces. The two braces that run up to a rafter in the back of the building are fully mortised.
The garden is awesome for bird watching--
Barn swallow babies getting irate with hunger:
Mock. Yeah. -ing. yeah.
When I get back on site I will get some more pictures of the siding and the (nearly) finished outpost.
Subscribe to:
Posts (Atom)