What I thought was really interesting and rewarding about the natural building week was the chance to listen to Micah talk about 'natural' enclosures for timber frame structures. Straw bales are of course an option and have their own issues. There is also the Structural Insulated Panel option, or some combination of conventionally framed walls (though that may seem a bit redundant). What Micah proposed was a light framework stuffed with a compacted straw clay mixture. You mix the straw (we did it with a pitchfork on a big table but you could set up a rotating drum mixer) with clay slip-a watery clay mix, and then pack the stuff down into formwork built between the timberframe structure. Once the straw sets (quite quickly) you remove the plywood forms and work your way up the wall; this is nice because you can repeatedly re-use a single set of forms. In this example structure, he also showed how you could make the walls with lathe to later accept natural clay plaster.
Corner detail with minimal thermal bridging.
Mixing the straw and clay slip.
Tamping down the corners.
It was amazing how quickly the wall setup, and even more so how solid it was after only a few hours. Breaking it down the next day was like busting up concrete.
Saturday, September 29, 2007
Wednesday, September 26, 2007
Heartwood week 2: Natural Building
Week two at Heartwood began by meeting our two young instructors for the following week's class on Sunday; Jonah and Micah (a former Heartwood apprentice himself) both pulled into the yard in bio-fuel-powered diesel 4x4s and it looked like the week was off to an interesting start.
To be brutally honest, when I had signed up for classes this summer, I actually had thought of skipping this week. The class was supposed to be about building an 'earthen oven' which I really didn't know anything about and I was really trying to concentrate on timberframing skills- not to mention I was attempting to keep a tight grasp on an already loosening budget. With Will's encouragement though, I agreed to sign up anyway and man am I glad I did. Every week this summer had something unique going for it; every week yielded unexpected enlightenment and knowledge- but this week of natural building class opened my eyes to a new perspective about something I had thought myself pretty up to date on.
By that I mean I had been reading a lot about green building and sustainable development (two terms that are certainly still being defined, especially in the field of construction) over the last couple of years. What I wasn't familiar with was the approach towards building that Jonah and Micah explained as Natural Building. This wiki gives a pretty good overview actually.
My take on this is that wherever possible you should try to use building materials that are locally available, renewable, and pose no harm if they eventually re-enter the ecosystem.
As Jonah explained it, natural building is something altogether different than what many people term 'green building'. From what I learned over the week, this difference lies not just in the approach, but in the attitude and the reasons why one chooses to build in the first place. Jonah stated that natural building is a movement of people- that is local and grassroots. One tenet is to keep in mind what sort of building is appropriate for the locale- this will help determine your materials. Natural building is based on relationships with your local environment and neighbors- social and cultural relationships are a priority. Natural building looks to be spiritually enriching and its proponents attempt to be inclusive of all ages and skills. Natural building takes a holistic approach versus Green building's commodity based focus on efficiency.
Okay, so those are my notes from some of our discussions and lectures. I am still on the fence about some of these ideas- but I love the discussion. My attraction to building is the satisfaction at being creative with objects and spaces that are practical, used in, and lived. I love the idea of building as an exercise, of architecture as a sculptural project- but I wonder about natural building's application with more standard spaces.
All philosophical mumbo jumbo aside- we had a great time with Micah and Jonah learning about new techniques and discussing how to be a little more conscious of where your materials come from. Everything for this project was certainly from a 100 mile radius- and none of it will harm anyone or thing if the oven gets knocked over or is worn away by time.
Making cob is pretty cool. There are ways to mechanize the process, but mixing small batches by hand (foot actually) fit the scale and tone of this project much better. It brought home the point that this sort of building is labor intensive in a a way that you have to embrace to really get anything worthwhile from the experience. In this sense this sort of small natural building project lends itself nicely to small groups or communities, schoolchildren, or just neighbours.
I realise as I write this (and this is the point of this blogging/writing thing) that I have too much to say, to think about, with all these ideas for this one simple post so I will try to get on with just describing our project.
Before any of the other eight students showed up, the four apprentices and our to instructors surveyed the site and discussed what exactly we would make and where it would go. As the site was on the side of a hill and the oven would need access from the kitchen, there were alot of considerations. This was the beginning of our orientation with what the guys meant about natural building decision making and I was pleasantly surprised. They really took into account your opinions about matters; while forming an opinion showed us that 1) our input was actually likely to count and 2) this was not going to be just following orders kind of learning- your input meant your investment. It is certainly not every forum or building project that can offer this, but it felt right for the project.
The goal (did you think I would ever get there?) was to build an outdoor cob pizza oven with an integrated bench. For 20 years worth of summer Thursdays, Will and Michelle have been putting on great hamburger barbecues but they were ready for a little variety.
We would make the structure from field stone, sand, clay, water, straw, some firebrick, a couple pieces of cherry cut from a tree on the site, planer shavings, and beer bottles (brewed and bottled in VT- thats a refund we gave up!).
Our materials for the cob: straw, clay, and sand.
Cob is a simple, resilient, strong, and flexible building material. A good bit of sand is dumped on a tarp and some clay is added- that is mixed together for a while until consistent and then straw is added as a binder (think of the fibers in fiberglass). This malleable mixture can be used for a vast range of applications.
Dave shows off the classic cob dance:
Rolling the tarp up to help in mixing- it reminded me of kneading a huge batch of bread dough...
The base of field stone has been painstakingly placed in a surprisingly strong interlocking pattern, the cob pillar and back for the bench are in place and developing, and the base of the oven is being formed to create an insulated platform- a batch of cob lies ready for business.
There was a lot of steps between this stage and the previous photos- I think I was too busy dancing on the cob to pick up my camera much (and was probably trying to keep it clear of the clay and sand...)
Lois, of the ever wonderful and intrepid Lois and Louis, getting down and dirty with the bench seat-
This insulative layer was made of clay slip (planer shavings and wet clay) and some donated beer bottles laid flat to create air spaces.
A flat and level layer of normal firebrick creates the floor of the oven, laid dry into sand that covered the insulating layer of beer bottles...
One of the astounding parts of building this deceptively simple oven was the dome of sand we used to form the oven cavity itself. Wet sand was formed to a certain dimension (agreed upon by oven builders as the ideal shape and size for a flueless-firing and maximum heat retention) and then we built another layer of insulation and cob over it, eventually removing the sand when everything had pretty much set.
The furry dome of insulation with a field stone lintel set up to delineate the doorway; one more layer of cob and we will be getting closer to pizzas- depending on the weather- note the tent over the site...
Fired up! In an attempt to speed things up and combat the very damp weather, we have removed the sand and lit a fire in the dome to try and harden the cob layers.
We've added the final coat of clay plaster and natural paint tinted with iron oxide-
The wet weather and hasty schedule result in a slump in the back of the oven- highlighting the advantages of the material; some students more familiar with braiding hair use straw to shore up the spot and we plaster over it...
Carved and scribed door and handle; the apprentices were respectively psyched to do something with wood again finally...
The final product getting warmed up for its first batch of pizzas-
Each student made a 'peel', what for you slide the pizzas in and out with- an great time and delicious dinner was had by all- the first dozen pizzas cooked quickly about 2-3 minutes each at approximately 575-625 F.
To be brutally honest, when I had signed up for classes this summer, I actually had thought of skipping this week. The class was supposed to be about building an 'earthen oven' which I really didn't know anything about and I was really trying to concentrate on timberframing skills- not to mention I was attempting to keep a tight grasp on an already loosening budget. With Will's encouragement though, I agreed to sign up anyway and man am I glad I did. Every week this summer had something unique going for it; every week yielded unexpected enlightenment and knowledge- but this week of natural building class opened my eyes to a new perspective about something I had thought myself pretty up to date on.
By that I mean I had been reading a lot about green building and sustainable development (two terms that are certainly still being defined, especially in the field of construction) over the last couple of years. What I wasn't familiar with was the approach towards building that Jonah and Micah explained as Natural Building. This wiki gives a pretty good overview actually.
My take on this is that wherever possible you should try to use building materials that are locally available, renewable, and pose no harm if they eventually re-enter the ecosystem.
As Jonah explained it, natural building is something altogether different than what many people term 'green building'. From what I learned over the week, this difference lies not just in the approach, but in the attitude and the reasons why one chooses to build in the first place. Jonah stated that natural building is a movement of people- that is local and grassroots. One tenet is to keep in mind what sort of building is appropriate for the locale- this will help determine your materials. Natural building is based on relationships with your local environment and neighbors- social and cultural relationships are a priority. Natural building looks to be spiritually enriching and its proponents attempt to be inclusive of all ages and skills. Natural building takes a holistic approach versus Green building's commodity based focus on efficiency.
Okay, so those are my notes from some of our discussions and lectures. I am still on the fence about some of these ideas- but I love the discussion. My attraction to building is the satisfaction at being creative with objects and spaces that are practical, used in, and lived. I love the idea of building as an exercise, of architecture as a sculptural project- but I wonder about natural building's application with more standard spaces.
All philosophical mumbo jumbo aside- we had a great time with Micah and Jonah learning about new techniques and discussing how to be a little more conscious of where your materials come from. Everything for this project was certainly from a 100 mile radius- and none of it will harm anyone or thing if the oven gets knocked over or is worn away by time.
Making cob is pretty cool. There are ways to mechanize the process, but mixing small batches by hand (foot actually) fit the scale and tone of this project much better. It brought home the point that this sort of building is labor intensive in a a way that you have to embrace to really get anything worthwhile from the experience. In this sense this sort of small natural building project lends itself nicely to small groups or communities, schoolchildren, or just neighbours.
I realise as I write this (and this is the point of this blogging/writing thing) that I have too much to say, to think about, with all these ideas for this one simple post so I will try to get on with just describing our project.
Before any of the other eight students showed up, the four apprentices and our to instructors surveyed the site and discussed what exactly we would make and where it would go. As the site was on the side of a hill and the oven would need access from the kitchen, there were alot of considerations. This was the beginning of our orientation with what the guys meant about natural building decision making and I was pleasantly surprised. They really took into account your opinions about matters; while forming an opinion showed us that 1) our input was actually likely to count and 2) this was not going to be just following orders kind of learning- your input meant your investment. It is certainly not every forum or building project that can offer this, but it felt right for the project.
The goal (did you think I would ever get there?) was to build an outdoor cob pizza oven with an integrated bench. For 20 years worth of summer Thursdays, Will and Michelle have been putting on great hamburger barbecues but they were ready for a little variety.
We would make the structure from field stone, sand, clay, water, straw, some firebrick, a couple pieces of cherry cut from a tree on the site, planer shavings, and beer bottles (brewed and bottled in VT- thats a refund we gave up!).
Our materials for the cob: straw, clay, and sand.
Cob is a simple, resilient, strong, and flexible building material. A good bit of sand is dumped on a tarp and some clay is added- that is mixed together for a while until consistent and then straw is added as a binder (think of the fibers in fiberglass). This malleable mixture can be used for a vast range of applications.
Dave shows off the classic cob dance:
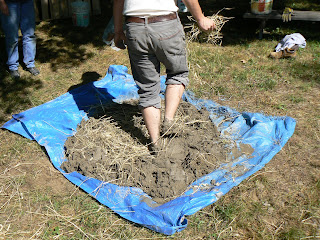
Rolling the tarp up to help in mixing- it reminded me of kneading a huge batch of bread dough...
The base of field stone has been painstakingly placed in a surprisingly strong interlocking pattern, the cob pillar and back for the bench are in place and developing, and the base of the oven is being formed to create an insulated platform- a batch of cob lies ready for business.
There was a lot of steps between this stage and the previous photos- I think I was too busy dancing on the cob to pick up my camera much (and was probably trying to keep it clear of the clay and sand...)
Lois, of the ever wonderful and intrepid Lois and Louis, getting down and dirty with the bench seat-
This insulative layer was made of clay slip (planer shavings and wet clay) and some donated beer bottles laid flat to create air spaces.
A flat and level layer of normal firebrick creates the floor of the oven, laid dry into sand that covered the insulating layer of beer bottles...
One of the astounding parts of building this deceptively simple oven was the dome of sand we used to form the oven cavity itself. Wet sand was formed to a certain dimension (agreed upon by oven builders as the ideal shape and size for a flueless-firing and maximum heat retention) and then we built another layer of insulation and cob over it, eventually removing the sand when everything had pretty much set.
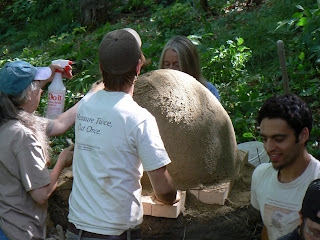
The furry dome of insulation with a field stone lintel set up to delineate the doorway; one more layer of cob and we will be getting closer to pizzas- depending on the weather- note the tent over the site...
Fired up! In an attempt to speed things up and combat the very damp weather, we have removed the sand and lit a fire in the dome to try and harden the cob layers.
We've added the final coat of clay plaster and natural paint tinted with iron oxide-
The wet weather and hasty schedule result in a slump in the back of the oven- highlighting the advantages of the material; some students more familiar with braiding hair use straw to shore up the spot and we plaster over it...
Carved and scribed door and handle; the apprentices were respectively psyched to do something with wood again finally...
The final product getting warmed up for its first batch of pizzas-
Each student made a 'peel', what for you slide the pizzas in and out with- an great time and delicious dinner was had by all- the first dozen pizzas cooked quickly about 2-3 minutes each at approximately 575-625 F.
Monday, August 20, 2007
Heartwood week 1: Intro to Timberframing, or Square rule Rules!
What a great experience.
I have been trying to get my thoughts together about this for a while. I am two weeks back in Holland and the false alarms about the impending arrival of child deux have petered out for the moment (again) so I suppose there is no excuse for putting this off until I come up with the perfect description of every moment.
My first week at Heartwood was a workshop on square rule timberframing. I have posted a little bit about it here, but I promised myself when I had the chance I would make the time to expound.
The Heartwood School was set up in the late 1970s to provide instruction to people who were interested in building their own homes- be it to save money and construct more energy efficient structures (anyone remember waiting in long lines to get gas?) or to invest one's own energy into creating a beautiful hand-built home to live in.
The south side of the schoolhouse showing the porch off the main classroom and the greenhouse.
When interest in timberframing took off in the area in the 1980s, Heartwood began to incorporate more classes in this traditional joinery technique. The first week for me was a workshop building a small cabin from locally milled eastern white pine using the square rule method of cutting joinery. Basically, this means that intersections on timbers of varying size are reduced to a common dimension at the joint allowing one to make structural connections without milling every piece to a standard. Its an ingenious way that traditional builders dealt with material before modern milling. This site has a nice overview of the differences between the two main methods of cutting timberframe joinery.
There is more to it than that of course- and for me that is really part of the great appeal of traditional building; to my mind these methods deserve to be studied and practiced for their value in creating beautiful, living structures and because learning and teaching them requires requires people to invest in and commit to making better, healthier places to live. If you are interested in how people made (and make) these amazing and soulful buildings, you have to appreciate the personal investment in the craft; it is really hand-crafted- the real skill and knowledge can't be bought.
Just moving the timbers around the yard that first day- organizing everything into some logical order for the week- was such a relief after weeks and weeks of reading about the framing process. You don't get splinters from books, but nothing beats seeing the grain of the wood and imagining what you can do with it...
Before we did anything, Will Beemer (our fearless director) gave us a primer on keeping our tools sharp- apart from knowledge about materials, the most critical part of successful cutting.
The first week's workshop was an introductory course; our project was a 12'x18' cabin with a small 9'x8' shed-roofed ell to provide for a small kitchen. The basics of cutting joinery for the frame were deceptively simple but provided everyone a chance to become familiar with all the joints you would need to build almost any sort of timberframe. One of the very cool things was the hand tool training. We eventually broke out this big dog, as well as this productive monster; but for the most part we used only hand tools. Chisel and mallet, handsaw, rabbet plane, spokeshave- it was amazing how quiet and calm a site can be when everyone is working by hand. No compressor noise, no cords everywhere, no dust kicked up by high rpm blades- you could actually hear the wind and the birds! After a while you realize that in many cases you can work just as fast, and safer with sharp hand tools. Plus you get the joy of cutting housing waste with an ax- surely a most underrated tool for most modern carpenters!
The essence of square rule- the diminished haunches and housing of a tie beam (if I remember correctly its position...)
One of the larger members of the frame- a top plate that will land over the posts and couch all the rafters as well. This was a stick that you had to really keep oriented in your head. one of the most important skills is being able to visualize the 'castle in the sky' - being able to orient yourself by looking at one piece and knowing where it fits in the whole frame.
Stick by stick, after four days of laying out and cutting, on Friday the frame grows on site in Connecticut about an hour and a half south of the school...
A critical juncture- the more joinery coming into one spot means less room for error, and more to keep track of when laying out.
No ridge beam in this frame, sheathing will eventually tie the roof to the rafters. Everything in the frame is pinned to together with hardwood pegs. Since it was a relatively small frame we even had time to mortise and tenon the rafter peaks. An interesting note about pegs- they don't function like a nail or other fastener in timberframe joinery- each joint is designed to function on its own, holding members in tension or compression without a fastener- the pegs make raising easier, draw joints together (by a very clever technique of offsetting peg holes to create 'drawboring'), and fix the wood during shrinkage.
Bringing the shed joists together with truck straps; the undersides of the joists are reduced and then tapered to strengthen the members without having to make everything larger to carry the joinery- they also look very cool when exposed. We used an adze and spokeshaves to make these curves.
The raising itself is a crucial process in timberframing- not only for the fact that this may be the first time you fit all the elements together (a real test of your layout and cutting prowess) but also because it has to be a cooperative effort getting everything in place safely by hand. The experience of every frame is unique- the knowledge and skills to do this right have to be learned by doing; there are manuals and treatises of a sort to gain some of the background, but the spirit of the craft is honest involvement in the process.
It was a lot packed into a single week, and more than I can wrack from my melon at the moment, but I hope this is a start to sharing some of my thoughts on what became a very intense seven week trip through timberframing.
Friday, April 27, 2007
Snob water
I'm not sure how long it will be accesible but this is a great look at sustainablilty and fashionable restaurants, food trends, and consumer choices as regards drinking water.
I like the convoluted logic it takes for people to realise that shipping water around the globe is ridiculous, as well as the Chez Panisse admission that they would still import wines from the best regions of the world. I admit, I would miss the thrill of having access to the finest things in the world (even shipping Japanese saws to cut dovetails in Georgia...) but it does make you think about what sorts of shipping and imports are really critical.
Wednesday, April 18, 2007
On the way to Heartwood
I recently found out that I'll be one of four apprentices this sumemr at the Heartwood School for Building Arts. I am really stoked; I'll be taking seven weeks of classes:
06/25-29 Timber Framing
07/02-06 Natural Building: Making an Earth and Straw Bake Oven
07/09-13 Converting Trees to Timbers
07/16-20 Raising & Rigging, Site Safety, Knots and Ropework
07/23-37 Scribing
07/30-08/10 Homebuilding
It will be an intense period but I hope I'll be able to make some good contacts in the area and make some headway into learning about joinery and sustainable building. I'll keep track here of things as they unfold.
Friday, March 02, 2007
Trip to Pioneer Valley
I recently flew over to the States to look at the Heartwood School and meet with Will Beemer about a possible apprenticeship this summer. I was pretty excited as I have been really focusing on finding a niche in timberframing since I began researching it a year or so ago. The area is the place to be- after four years in crowded Northern Europe I am more than ready to be back where you can take a walk in the woods; where there are actual stands of trees.
The school looked like a great place to make connections and get some great training. I should hear back from them in a couple of weeks. I stayed with my cousin in Northampton and had a great time exploring the area a bit and eating some awesome sushi (something I have desperately missed). The whole area really felt like it would be a pretty ideal place for us to move next year. We'll see.
One of many interesting things I got to do was check out the incredibly well stocked Smith College Museum of Art. Especially cool was the exhibit on Beyond Green: toward a sustainable art. My easy favorite was an idea called paraSITE shelters. I love the ingenuity and practicality of them. A lot of the rest of the ideas were okay- some were a bit hokey, and it seems everyone has to write these immensely wordy statements to explain every thought that went into the conception of anything. A bit much to stand there and read the walls.
A church steeple in Northampton; they are turning this old church into a music club-
On the way to Heartwood-
Woodshed-
School greenhouse-
Another woodshed, a potential project this summer-
Wednesday, January 17, 2007
Local Timberframing
This is an article I wrote last November for the local paper (there is an english language section for international students and proffessionals in the area).
"Cultural spotlight: Traditional farmhouse architecture in Twente
From the unique style of the Amsterdam School to the modernism of Rem Koolhaas, Dutch architecture is world famous. But you don’t have to go far to find some very interesting examples of historic vernacular architecture here in the Twente area.
Some excellent examples of interesting structures that speak directly to the local culture and history of the area can be found in many surviving timber framed farm buildings, some dating back to the 12th century. The oldest can be found between Enschede and Hengelo in the Twekelo area. Het Mensink, het Baardink, and het Kotman were all established sometime in the 12th century. Some of these ancient buildings are still in use as farms and living spaces today.
The open air museum in Ootmarsum (http://www.openluchtmuseumootmarsum.nl/) is also a great place to see examples of this construction as well as an interesting view into life on a farm reaching back to the Middle Ages. Another example, from the 18th century, is the ‘Groot Bavel’ los hoes which stands behind the Rijksmuseum in Enschede. Los hoes translates roughly as ‘open house’ and denotes a type of farm building/barn that was divided into sections for people and animals. Today this farmhouse contains a museum exhibit dedicated to the victims of the firework explosion of 2000 in the neighbourhood bordering the museum. The timber frame construction, along with the fact that these buildings have stood the test of time and are made of renewable resources, has become a popular subject for specialty homebuilders today in America and England. The simple but elegant joinery and construction techniques in these old (sometimes ancient) farm buildings is proving to be a valuable cultural resource as well as the inspiration for new sustainable building practices.
One distinctive hallmark of Twente farm buildings can still be seen in many forms today on the gable ends of houses as well as hanging next to front doors. Called a gevelteken or stiepelteken, these ancient signs marked a building for its owner, showed the faith of the family, and were meant for good luck and protection. The oldest surviving in Enschede can be seen as a fragment placed in the entrance gallery of the Groot Bavel. It shows one of the oldest and most popular motifs, the zandloper or hourglass figure. Simplified to two triangles, this motif can also be seen in the ubiquitous red and white window shutters on many buildings in Twente. These older signs were simply carved into the face of a vertical beam in some prominent location. A more elaborate form eventually evolved, carved from a tall flat piece of wood into a group of symbols standing on each other- something like a totem pole. These can be seen at the peak of the main gable of the barn or farmhouse, or sometimes next to the front door of more contemporary homes. Each stylised part of the carving represented something about the family; properly informed, one could read a lot about the inhabitants. Some are easily discernible- a heart for love, a cross for Christianity; while others are more abstract-an anchor (symbol of hope), a blooming tulip, the Catholic host, stylised wheat stalks or the moon symbolising fertility, a circle pierced seven times representing the sun and seven days of the week, and the status symbol of local farmers- the double horse head or ‘Twentse ros’."
This is the back (sunny) side of the Los Hoes building. Its been moved- I wonder how it was originally oriented?:
The 'hourglass' stiepelteken by the front entrance:
Joinery inside:
And from outside:
Detail of roofing, thatch covered with tiles:
Los Hoes from the frontside:
Thursday, January 04, 2007
Permeable roads
I'll just say that one resolution for this year is to post here more frequently. I promise to finish going through the ideas and examples in 'How Buildings Learn', but I'll have to wait until I have a bit more free time. For the moment there are a couple of things I've been thinking about over the last months; differences in building conventions between Europe and the States.
As you ride your bike around the Netherlands (itself another great sustainable
habit that is reinforced by the necessary infrastructure,) you immediately notice the unique quality of the roads. Though the main roadways and highways are paved, most residential streets and certainly the town centres are all paved in brick, cobblestone or 'pavers'. Cobblestone is actually pretty rare except for really old sections where there is mostly foot traffic. The whole art of laying brick streets is a respected tradition here- there are even competitions for speed and artistry held regularly. The greenest part of these roads is that you have an integral drainage system (the whole design is aggragate, a layer of compacted sand, and bricks or pavers) that avoids the runoff problems of conventionally paved surfaces. There are still sewers but you rarely have the accumulation that you can get with paved surfaces, even after the (frequent) heavy rains. It is also much simpler to make repairs or access buried services; the pieces covering the area are just removed and replaced without a huge amount of effort or resources. The streets do need occassional maintenance as things settle and move over the years. They recently came and pulled up our entire street brick by brick and re-graded it for drainage and then relaid each brick.
One of the funniest things was the way they worked around this guy's car one day- everyone else had moved their car off the street by then but I guess he didn't need to go anywhere. They eventually moved it and redid the street in that spot.
Months later, my neighbor's water line from the street broke and after he called the utility company, they quickly came, located the valve in the street and pulled enough bricks out to shut it off.
Subscribe to:
Posts (Atom)